JTW Tokens Explained

What are JWT Tokens, how are they used, what are they made of?"
In this post, we explore how JTW Tokens are generated and what applications they are utilised for within the authentication structure and logic. Also I will have a detailed example of how to implement within svelteKit. After reading this docs you should have a solid understanding of JWT’s .
JWT Tokens are powerful security-oriented access features for your application, helping to secure APIs and manage authentication within modern applications.
Table of Content
What is a JWT Token?
JWT stands for JSON Web Token. It is an open standard (RFC 7519) that defines a compact and self-contained way to securely transmit information between parties as a JSON object.
JWTs are commonly used for authentication and authorization in web applications. One of the main benefits of using JWT (JSON Web Tokens) is that you do not need to store session data in your database.
Key Features of JWT Tokens:
- Compact & URL-safe: JWT tokens are small and URL-safe, making them easy to transmit via HTTP headers or as URL parameters.
- Self-contained: JWTs carry all the necessary information within themselves, reducing the need to query a database on every request.
- Secured via Signature: JWTs are signed using a secret key (HMAC) or a public/private key pair (RSA or ECDSA), ensuring the integrity of the data.
- Stateless Authentication: Since the token contains all the required user information, no server-side session storage is needed.
- Flexibility: JWT tokens can store any kind of information you need, such as user roles, permissions, and more, making them highly versatile.
- Client-Side Storage: The JWT token is typically stored aka living on the client side (in
localStorage,sessionStorage), allowing the client to manage its own authentication state. Cookies are often used to store JWT tokens for persistence across sessions and for automatic token transmission with each request. - Single Sign-On (SSO): JWT can be used across multiple platforms or applications, allowing users to sign in once and gain access to several applications.
Benefits of Using JWT Tokens:
- Enhanced Security: JWT tokens are signed, ensuring that the data cannot be tampered with. You can also add encryption for an extra layer of security.
- Scalable: JWT’s stateless nature helps improve scalability by removing the need for centralized session management within a database.
- Improved Performance: As JWT tokens store user information and are self-contained, there is no need for the server to maintain user session data.
- Easy Integration: JWTs can easily be integrated with various backend frameworks and services, such as SvelteKit, TypeScript, Node.js, Python, Go, etc.
When should you use JWT Token?
-
Authorization: This is the most common scenario for using JWT. Once the user is logged in, each subsequent request will include the JWT, allowing the user to access routes, services, and resources that are permitted with that token. Single Sign On is a feature that widely uses JWT nowadays, because of its small overhead and its ability to be easily used across different domains.
-
Information Exchange: JSON Web Tokens are a good way of securely transmitting information between parties. Because JWTs can be signed, for example using public/private key pairs—you can be sure the senders are who they say they are. Additionally, as the signature is calculated using the header and the payload, you can also verify that the content hasn’t been tampered with.
How do JWT Tokens Work?
![]()
JWT tokens are made up of three parts:
- Header: Contains metadata about the token, such as the signing algorithm used (e.g., HMAC SHA256 or RSA).
- Payload: Contains the claims, which are the statements about an entity (typically, the user-id) and additional data. There are 3 types of claims:
- Registered Claims: Standard claims such as
iss(issuer),exp(expiration time),sub(subject), etc. - Public Claims: Custom claims created to share information between parties.
- Private Claims: Claims used to share information between parties that agree on using them.
- Registered Claims: Standard claims such as
- Signature: The header and payload are encoded and then signed using a secret key or a public/private key pair to prevent tampering.
This structure ensures that the data inside the JWT is secure and can be verified by the recipient.
| Therefore, a JWT typically looks like the following.
xxxxx.yyyyy.zzzzz
| Real JWT looks like the following._
eyJhbGciOiJIUzI1NiIsInR5cCI6IkpXVCJ9.eyJ1c2VyX2lkIjoiYzg5ZDUwNTktNzM3MC00ODJjLTkxZjUtMzhlNzBlMzQzYTEzIiwiaXNzIjoiWW5vdFkyIiwiZXhwIjoxNzM0NzQ4MzA5LCJpYXQiOjE3MzQ3NDQ3MDl9.VkONZeeTmAKEwdIMGQj4P0mrp5ipXDkiiWIxbraHtTM
Flow of JWT accessToken Authentication
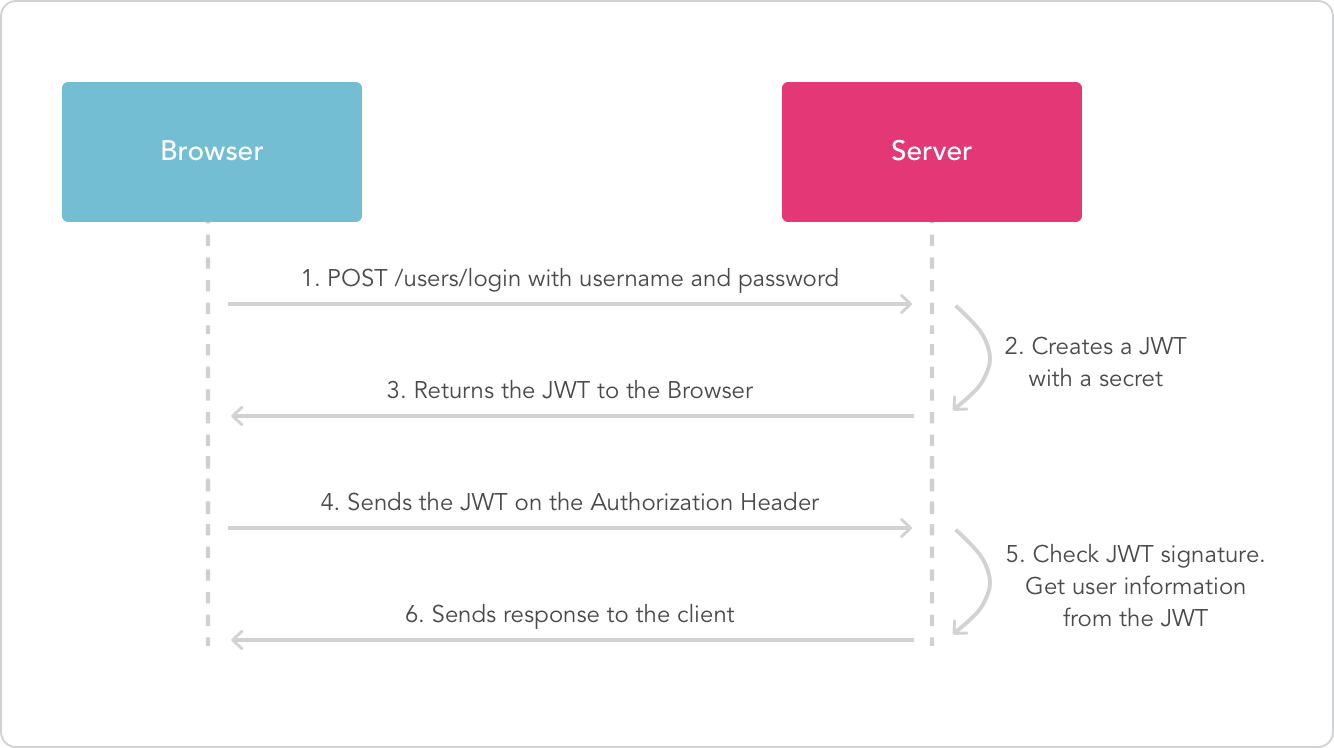
- Create the JWT accessToken Token: After a user logs in successfully, generate a JWT accessToken token containing the user’s information and any aditional info.
- Send the Token to the Client: The JWT accessToken is sent back to the client, typically in the HTTP response, where it can be stored in localStorage, sessionStorage, or cookies. Most common will be storing within cookies.
- Client Sends Token with Requests: For subsequent requests to protected resources, the client sends the accessToken in the Authorization header (
Bearer token). - Verify the Token: On the server-side, the accessToken is verified by checking its signature.
- Grant Access or Deny: If the token is valid and not expired, the user is granted access to the private route requested resource. If not, the user is denied access and redirected to the login page. Or if they want to access public routes on webpage, no authenticated access is needed.
What does a JWT look like ?
- schema of how a JWT is typically built: (Note that this is not how a JWT actually looks when generated. )
{
"header": {
  "alg": "string",  // JWT signing algorithm (e.g., HS256, RS256)
  "typ": "string"   // Type of token, generally "JWT"
},
"payload": {
  "iss": "string",  // Issuer of the JWT
  "sub": "string",  // Subject of the JWT (typically the user identifier aka userID)
  "aud": "string",  // Audience of the JWT
  "exp": "integer", // Expiration time in Unix timestamp
  "nbf": "integer", // Not before time in Unix timestamp
  "iat": "integer", // Issued at time in Unix timestamp
  "jti": "string",  // JWT ID (unique identifier for the token)
  "role": "string"  // Custom claim (e.g., "admin", "user", etc.)
},
"signature": "string"  // Base64Url encoded signature (result of signing header + payload)
}
- parsed JWT :
console.log(JSON.stringify(access_token))
{
  value: 'eyJhbGciOiJIUzI1NiIsInR5cCI6IkpXVCJ9.eyJzdWIiOiI5MTYwNGQxYy01YzJiLTQ2ZjYtODVlOC04ZWQ3MWNjNDNjN2EiLCJib25kaW5nX2lkIjoibDdWRzNtREhXRThsS1krUmpYUGsrOURFRGNKb0ZXYldTZz09IiwiaXNzIjoiWW5vdFkyIiwiZXhwIjoxNzM1NDY2ODE0LCJpYXQiOjE3MzU0NjY4MDR9.xFfwCDMJ_tqdqGI5EQpDYf2sQZtgauPureaLLbDPxZA',
  header: { alg: 'HS256', typ: 'JWT' },
  payload: {
    sub: '91604d1c-5c2b-46f6-85e8-8ed71cc43c7a',
    bonding_id: 'l7VG3mDHWE8lKY+RjXPk+9DEDcJoFWbWSg==',
    iss: 'Ynot',
    exp: 1735466814,
    iat: 1735466804
  },
  parts: [
    'eyJhbGciOiJIUzI1NiIsInR5cCI6IkpXVCJ9',
    'eyJzdWIiOiI5MTYwNGQxYy01YzJiLTQ2ZjYtODVlOC04ZWQ3MWNjNDNjN2EiLCJib25kaW5nX2lkIjoibDdWRzNtREhXRThsS1krUmpYUGsrOURFRGNKb0ZXYldTZz09IiwiaXNzIjoiWW5vdFkyIiwiZXhwIjoxNzM1NDODE0LCJpYXQiOjE3MzU0NjY4MDR9',
    'xFfwCDMJ_tqdqGI5EQpDYf2sQZtgauPureaLLbDPxZA'
  ],
  algorithm: 'HS256',
  expiresAt: 2024-12-29T10:06:54.000Z,
  issuedAt: 2024-12-29T10:06:44.000Z,
  subject: '91604d1c-5c2b-46f6-85e8-8ed71cc43c7a',
  issuer: 'Ynot',
  jwtId: null,
  audiences: null,
  notBefore: null
}
Experation time common confusion
The expiration time of a cookie set in the browser is different from the expiration time of the JWT stored within it. Once the cookie expires, it is no longer sent with HTTP requests, meaning SvelteKit or any server-side application cannot read it. However, even if the JWT inside the cookie has expired, it can still be read from the cookie as long as the cookie itself is valid and present in the request.
The key takeaway is to ensure that both the cookie and JWT expiration times are properly managed: the cookie should persist long enough for your needs, and the JWT’s claims (like the exp field) should be validated on the server. With proper handling of both, you can implement token rotation and ensure your system functions as expected.
( I almost though my whole mental model on auth was wrong when my server could not read the JWT within the cookie. It was returned as undefined when I attempted to fetch it. Even when I could see the cookie within my browser-storage dev pannel. As mentioned above the reason for this happening was that the cookie exp-time was set to 1H. So now I have it set to same time as refreshToken expiration-time 30 days ^^ . )_
Let’s clarify the key points here:
-
Cookie Expiration (
maxAge/expires):- When the cookie expires:
If the cookie has expired (based onmaxAgeorexpires), it will not be included in subsequent HTTP requests. The browser does not send expired cookies. - The cookie expiration time is independent of the JWT stored inside it. If the cookie expires, the browser will no longer send it with requests, regardless of whether the JWT is expired or not.
- When the cookie expires:
-
JWT Expiration (
expclaim in JWT):- When the JWT expires:
The JWT’s expiration is based on theexpclaim inside the token. Even if the JWT is expired, the browser can still send the cookie with the request (as long as the cookie itself is not expired). - The JWT is treated as invalid by the server during validation because its
expclaim has passed, but the JWT itself will still be sent with the request if the cookie is still valid (i.e., not expired).
- When the JWT expires:
Signing process for JWT | HS256 for HMAC-SHA256
HS256 (HMAC-SHA256) is a widely used algorithm for signing and verifying JSON Web Tokens (JWTs). It uses a shared secret key to generate a symetric signature that ensures the integrity and authenticity of the JWT. The signing process involves creating a message hash using the HMAC algorithm with the SHA-256 hash function.
In this documentation, we will outline how to sign and verify JWTs using the HS256 algorithm with a secret key stored in an environment variable.
Steps for creating, signing, parsing JWT using HS256 (HMAC-SHA256) && oslo/jwt
npm install oslo
npm install crypto
I will be using the oslo library mentioned at the top of the docs. I am building my functions within ./src/lib/server/auth.ts and exporting them.
I am using one already defined functions from oslo library, and one custom function. There are a few imports needed to correctly work with JWT’s within my set-up:
| ./src/lib/server/auth.ts
import { createJWT } from 'oslo/jwt';
import { createHmac } from 'crypto';
import { TextEncoder } from 'util';
import { TimeSpan } from 'oslo';

import { env } from '$env/dynamic/private';

// JWT Configuration Constants
if (!env.JWT_SECRET) throw new Error("JWT_SECRET is not defined in the .env file");

// AccessToken , and RefreshToken
const ACCESSTOKEN_EXPIRATION_TIME = new TimeSpan(20, 'm'); // Access token valid for 20 min
To work with JWT tokens you really only need these 2 functions, there are a few small steps that will also need to be taken to securelly and correctly work with JWT. But these can just be syntax outside of a function.
- generateJWT [ oslo function ]
- validateJWToken [ custom function ]
In my example showcase I will be using JWT accessToken to apply authentication token rotation method within a svelteKit application ( note that I am not explaining all the steps this would take like generating refreshToken, etc. You can find this within the Semi-Custom Authentication docs within the svelteKit category of my docs. ). Altough you can ofcours modify the functions to work how-ever you’d like.
1. Preparation: Set Up Environment
Before starting the signing process, ensure you have the following:
- A secret key for signing the JWT. This should be securely stored in an environment variable
.env, for example,JWT_SECRET.
JWT_SECRET="example-good-secure-string-but-always-make-your-own-string-yeye-okay-ynot"
- Define the expiration time for you’re accessToken ACCESSTOKEN_EXPIRATION_TIME . This should be defined within the
./src/lib/server/auth.ts.
2. Placing claim’s within JWT
When creating a JWT the most important thing to note and think about is what data aka information you want to store within the JWT claims and payload.
In my case because I am using the JWT for authentication I am storing ofcours my user_id corresponding to unique user-acc. And also the recently generated bonding_id. Notice that’s also what I am passing to the function.
I am also enabling includeIssuedTimestamp, and ofcours what can not be missed ACCESSTOKEN_EXPIRATION_TIME in my case this is set to 20 min.
The great thing about using the oslo library is that I can quite simply pass my data into the oslo function createJWT. This function when called simply returns the complete signed created JWT string. You can modify you’re functions claims and options enabled to fit you’re needs.
HMAC_SHA256: The HMAC algorithm using SHA-256.secret_key: The secret key stored in the environment variableJWT_SECRET.payload: The payload containing defined claims.options: The options I can set within the function when creating JWT
~
View all options able to set within JWT with oslo here
| ./src/lib/server/auth.ts
// Function to generate JWT, now accepting user_id
export async function generateJWT(user_id: string, bonding_id: string): Promise<string> {
	try {
		// Ensure secret key is an ArrayBuffer or TypedArray
		const secretKey = new TextEncoder().encode(env.JWT_SECRET); // Converts string to Uint8Array

		// Create the JWT payload, including the user_id
		const payload = {
		"sub": user_id,
		"bonding_id": bonding_id
		};

		// Create the JWT
		const jwt = await createJWT("HS256", secretKey, payload, {
		expiresIn: ACCESSTOKEN_EXPIRATION_TIME,
		issuer: "Ynot",
		includeIssuedTimestamp: true,   // Include the issued timestamp (iat)
		});

		return jwt;

	} catch ( error:any ) {
	  throw new Error("Error while generating JWT: " + error.message );
	}
}
3. Setting JWT within client-browser cookie
After defining what you’re JWT accessToken structure will look like and what data you want within it. You can easily call you’re function, and return the created JWT.
In the signup backend logic, you can set the generated JWT within an HTTP cookie using the event.cookies.set() method. This is because the event object allows you to interact with the HTTP request, enabling you to set the cookie on the user’s browser directly after the user is created, which is essential for session management.
| ./src/routes/auth/signup/+page.server.ts
		const jwt = await auth.generateJWT(createdUser?.user.id, bonding_id)
		console.log(`Fresh JWT created : ${JSON.stringify(jwt)}`)

// Now I can safely set the JWT within a cookie on users browser :D
		try {
			// Access cookies from the event object
			event.cookies.set('token', accessToken, {
				httpOnly: false,  // Prevents JavaScript access to the cookie set within live app only
				sameSite: 'Lax', // Helps with CSRF protection
				secure: false,   // Only set the cookie as secure in production (HTTPS)
				maxAge: 31556952,    // Set expiration to 1 year (31556952 seconds) only on the COOKIE
				path: '/',       // Cookie is available across the entire app
		});

		} catch (error) {
			console.error('Error during signup:', error);
			return fail(500, { message: 'Something went wrong' });
		}
Because I am simply testing on localhost while developing the above cookie parameters are fine. But when you are actually deploying you’re application you will need secure cookies on client-browser.
- For actuall deployment cookie must look like this:
event.cookies.set('token', accessToken, {
  httpOnly: true,  // Prevents JavaScript access
  sameSite: 'Lax',  // Helps with CSRF protection
  secure: true,     // Only set the cookie as secure in production (HTTPS)
  maxAge: 2592000,  // 30 days, same as refreshToken
  path: '/',        // Available across the entire app
});
- While developing cookie can look like this:
event.cookies.set('token', accessToken, {
  httpOnly: false,  // Prevents JavaScript access
  sameSite: 'Lax',  // Helps with CSRF protection
  secure: false,     // Only set the cookie as secure in production (HTTPS)
  maxAge: 2592000, // 30 days, same as refreshToken
  path: '/',        // Available across the entire app
});
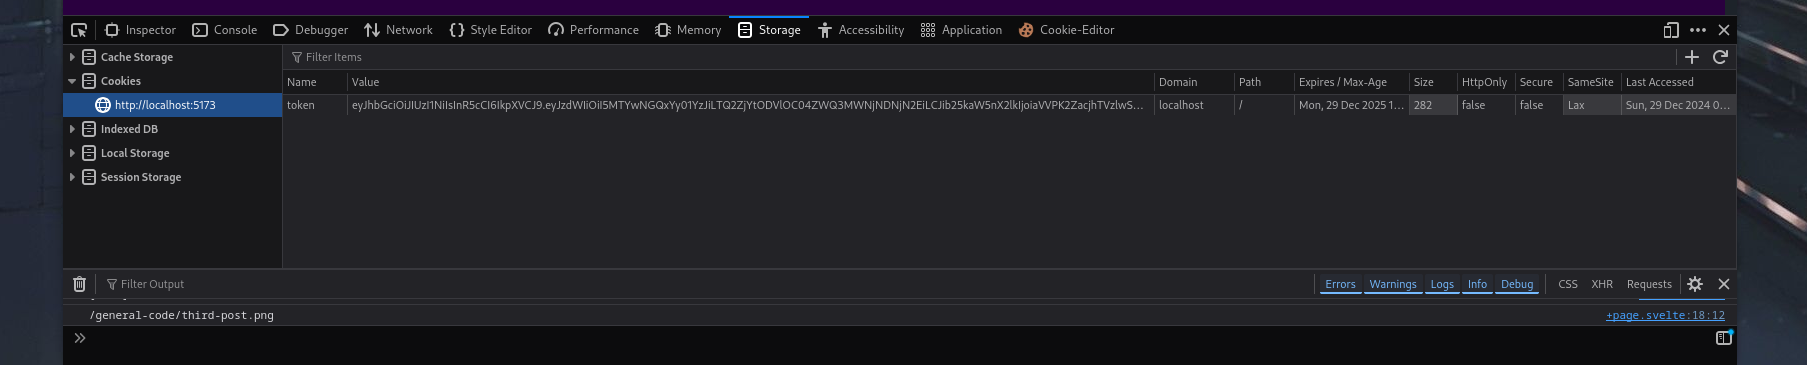
You can inspect if the JWT string within you’re console was successfully set on the browser by inspecting with devtools f12 .
4. Fetching JWT from cookie
As mentioned above within the docs, if the cookie is still valid and not expired on the client-browser. Then the cookie will be sent with every http request, and we can get the JWT accessToken from the cookie via the event object.
This is handled within the hooks.server.ts which can intercept every request and then foward it. I am accessing the token once again via event.cookies method.
| ./src/hooks.server.ts
const handleAuth = async ( { event, resolve } ) => {
	// First I will need to read the cookie from browser
	const access_token = event.cookies.get('token')

	if (!access_token) {
		// if there is no cookie load page as normal
		console.log('no accessToken found')
		return await resolve(event)
	};

  console.log(JSON.stringify(access_token))
  return await resolve(event)

}

export const handle = sequence(handleAuth)
5. Verifying JWT signature
I actually wrote a custom function for verifying the signature of my JWT’s. Because the native oslo library function returns a error when the JWT is expired, even if the signature is valid. And if you try to catch the error the JWT will be returned as undefined .
So I created my own custom-function that will only check if the JWT’s signature is valid, and either throw error if invalid. Or return the full JWT object if valid ![]() :
:
| Valid JWT accessToken
{
  value: 'eyJhbGciOiJIUzI1NiIsInR5cCI6IkpXVCJ9.eyJzdWIiOiI5MTYwNGQxYy01YzJiLTQ2ZjYtODVlOC04ZWQ3MWNjNDNjN2EiLCJib25kaW5nX2lkIjoiQnFMMVowNlgrV0kwcXNIWUk0eGJlUlJwTGRsb1kxYjFXQT09IiwiaXNzIjoiWW5vdFkyIiwiZXhwIjoxNzM1NDY1ODg0LCJpYXQiOjE3MzU0NjU4NzR9.bcPBvf3Llbmp6yJz0psVmFtXp8Q9i2rs24JbGTDmROU',
  header: { alg: 'HS256', typ: 'JWT' },
  payload: {
    sub: '91604d1c-5c2b-46f6-85e8-8ed71cc43c7a',
    bonding_id: 'BqL1Z06X+WI0qsHYI4xbeRRpLdloY1b1WA==',
    iss: 'Ynot',
    exp: 1735465884,
    iat: 1735465874
  },
  parts: [
    'eyJhbGciOiJIUzI1NiIsInR5cCI6IkpXVCJ9',
    'eyJzdWIiOiI5MTYwNGQxYy01YzJiLTQ2ZjYtODVlOC04ZWQ3MWNjNDNjN2EiLCJib25kaW5nX2lkIjoiQnFMMVowNlgrV0kwcXNIWUk0eGJlUlJwTGRsb1kxYjFXQT09IiwiaXNzIjoiWW5vdFkyIiwiZXhwIjoxNzM1NDY1ODg0LCJpYXQiOjE3MzU0NjU4NzR9',
    'bcPBvf3Llbmp6yJz0psVmFtXp8Q9i2rs24JbGTDmROU'
  ],
  algorithm: 'HS256',
  expiresAt: 2024-12-29T09:51:24.000Z,
  issuedAt: 2024-12-29T09:51:14.000Z,
  subject: '91604d1c-5c2b-46f6-85e8-8ed71cc43c7a',
  issuer: 'Ynot',
  jwtId: null,
  audiences: null,
  notBefore: null
}
| ./src/lib/server/auth.ts
interface JwtHeader {
	alg: string;
	typ: string;
}

interface JwtPayload {
	sub: string;
	bonding_id: string;
	iss: string;
	exp: number;
	iat: number;
	jti?: string; // Optional, JWT ID
	aud?: string | string[]; // Optional, audience claim, could be a string or array of strings
	nbf?: number; // Optional, "not before" claim (UNIX timestamp)
}

interface JwtValidationResult {
	value: string;
	header: JwtHeader;
	payload: JwtPayload;
	parts: string[];
	algorithm: string;
	expiresAt: Date;
	issuedAt: Date;
	subject: string;
	issuer: string;
	jwtId: string | null;
	audiences: string | string[] | null;
	notBefore: Date | null;
}

// This is fully custom function, that always returns either if the signature is VALID or INVALID
// regardless of if the JWT is expired.
export async function validateJWToken(jwt: string): Promise<JwtValidationResult | null> {
	try {
	  // Step 1: Split JWT into three parts (header, payload, signature)
	  const [headerBase64, payloadBase64, signatureBase64] = jwt.split('.');

	  if (!headerBase64 || !payloadBase64 || !signatureBase64) {
		throw new Error('Invalid JWT format.');
	  }

	  // Step 2: Decode the base64-encoded header and payload
	  const header = JSON.parse(Buffer.from(headerBase64, 'base64').toString('utf8')) as JwtHeader;
	  const payload = JSON.parse(Buffer.from(payloadBase64, 'base64').toString('utf8')) as JwtPayload;

	  // Step 3: Recreate the data to sign (header + payload)
	  const dataToSign = `${headerBase64}.${payloadBase64}`;

	  // Step 4: Validate the JWT signature
	  const secretKey = new TextEncoder().encode(env.JWT_SECRET); // Ensure the secret is in Uint8Array
	  const expectedSignature = createHmac('sha256', secretKey)
		.update(dataToSign)
		.digest('base64url');

	  if (expectedSignature !== signatureBase64) {
		throw new Error('Invalid JWT signature');
	  }

	  // Step 5: Prepare response object (even if token is expired, return the data)
	  const validationResult: JwtValidationResult = {
		value: jwt,
		header: header,
		payload: payload,
		parts: [headerBase64, payloadBase64, signatureBase64],
		algorithm: header.alg,
		expiresAt: new Date(payload.exp * 1000), // Convert from UNIX timestamp to Date
		issuedAt: new Date(payload.iat * 1000), // Convert from UNIX timestamp to Date
		subject: payload.sub,
		issuer: payload.iss,
		jwtId: payload.jti ?? null, // Use null if jti is not present
		audiences: payload.aud ?? null, // Use null if aud is not present
		notBefore: payload.nbf ? new Date(payload.nbf * 1000) : null,
	  };

	  // Return the validated token data (even if expired)
	  return validationResult;

	} catch (error: unknown) {
	  // Error handling for invalid signature or invalid JWT format
	  if (error instanceof Error) {
		if (error.message.includes('Invalid JWT signature')) {
		  throw new Error('Invalid JWT signature.');
		}
		// Handle invalid JWT format or any decoding issues
		throw new Error('Invalid JWT format or decoding issue: ' + error.message);
	  } else {
		console.error('Unexpected error:', error);
		throw new Error('Unexpected error during JWT validation.');
	  }
	}
}
When the server receives the JWT, it needs to verify that the token has not been tampered with.
If the recalculated signature matches the signature in the JWT, the token is valid. If they don’t match, the JWT is considered invalid.
| ./src/hooks.server.ts
  console.log('Checking AccessToken signature')
	let valid_access_token
	try {
		valid_access_token = await auth.validateJWToken(access_token);

	} catch (error: unknown) {
		// Handle known error types
		if (error instanceof Error) {
			//console.log(error)
		  // Check for the specific error related to unique constraints (e.g., duplicate usernames)
			if (error.message.includes('Invalid JWT signature')) {
				console.log('Invalid JWT signature')
				return await resolve(event)
				// we simply continue do nothing
			}
		  } else {
			  // Unexpected error handling
			  console.log(error)
			  console.error('Error validating JWT signature:', error);
			  return await resolve(event)
			}
	};

  console.log(JSON.stringify(access_token))
  return await resolve(event)
Bellow I have two generated JWT’s, both contain the exact same header. As you can see the payload part of the JWT’s is identical. But the signature part for both JWT’s is indeed completely different. This makes allot of sence, as using the HMAC-SHA256 algorithem produces unique signatures. Still both of these signatures can be validated using the set secret-key.
eyJhbGciOiJIUzI1NiIsInR5cCI6IkpXVCJ9.eyJ1c2VyX2lkIjoiYzkxZTA2ZTMtOGNlYS00OTUyLTlhYWEtU1OGM1MTk1NDE1IiwiaXNzIjoiWW5vdFkyIiwiZXhwIjoxNzM0NzU0ODI0LCJpYXQiOjE3MzQ3NTEyMjR9.VXVo82YMVygnVOQsitPwLZjVKjJhPDEzb1RFsy1D8Bw
eyJhbGciOiJIUzI1NiIsInR5cCI6IkpXVCJ9.eyJ1c2VyX2lkIjoiMjIwOWNjNmYtYmNhMS00MWIwLTg0ZWYtYjRjZTgzNzgxMjg1IiwiaXNzIjoiWW5vdFkyIiwiZXhwIjoxNzM0NzU0ODYxLCJpYXQiOjE3MzQ3NTEyNjF9.OUlqa6gbXnzePxncNecpIH43yDVry2MK9BdZ_jKQDB4
6. Make sure JWT is not expired
For my use case it’s really important to make sure the JWT is not expired. Because if it was expired I would need to start the token-rotation logic.
As mentioned above this lil docs really purely focuses on using JWT’s within a live env. Not custom rolling auth implementation.
Anyway you should always make sure you’re JWT is not expired, I mean if your using it to transmit data you can set a hella long expire time period. But in auth nahh, really short exp time.
| ./src/hooks.server.ts
// Check if JWT is NOT expired. Make sure JWT Access Token created AFTER the JWT Refresh Token
if (!(valid_access_token?.payload.exp < currentTime)) {
  console.log('yeyey token is not expired')
  return await resolve(event)
};
7. Parsing JWT
Now after having verified both the JWT’s authenticity and also it’s expiry time. We can actually parse it!
You can simply parse the JWT’s by accessing it’s data from the object just like you would any other object within typescript. I have some example syntax:
| ./src/hooks.server.ts
	// Now make sure the RefreshToken has a I.A.T younger then AccessToken I.A.T
	if (valid_refresh_token?.payload.iat > valid_access_token?.payload.iat) {
		console.log('nahnah AccessToken token has already been rotated, I.A.T of ACCESSTOKEN is YOUNGER then refreshToken')
		// Should redirct to login-page
		return await resolve(event)
	};

	// Now check if the JWT refreshToken has a matching bonding_id with JWT AccessToken
	if (!(valid_refresh_token?.payload.bonding_id == valid_access_token?.payload.bonding_id)) {
		console.log('AccessToken token has already been rotated, NO BONDING_ID MATCH')
		// should redirct to login page
		return await resolve(event)
	};

  let result
	try {
		result = await update.updateRefreshTokenDB(refreshToken, valid_access_token?.payload.sub)
		if (result.status != 200) {
			console.log('Something went wrong updating refreshToken within db [ hooks.server.ts ]')
			console.log(result)
			return await resolve(event)
		};

	} catch ( error ) {
		console.log('Something went wrong updating refreshToken within db [ hooks.server.ts ]')
		console.log(result)
		return await resolve(event)
	};
Summary
- Preparation: Set Up Environment
- Install the Oslo library using
npm install oslo. - Store a secret key (
JWT_SECRET) securely in your environment variables (e.g.,.envfile).
- Create and Sign JWT
- Use the
createJWTfunction from Oslo to generate a JWT. - Pass the necessary claims (e.g.,
user_id,bonding_id, and expiration time) in the payload. - The JWT is signed using HMAC-SHA256 with the secret key stored in the environment.
- Setting JWT in Client Browser Cookie
- After generating the JWT, set it in an HTTP cookie on the user’s browser.
- Use
event.cookies.set()method to set the JWT, ensuring security configurations (e.g.,httpOnly,secure,sameSite).
- Fetch JWT from Cookie
- The JWT is automatically sent with each HTTP request if the cookie is valid and not expired.
- Access the JWT from the cookie in
hooks.server.tsvia theevent.cookies.get()method.
- Verifying JWT Signature
- Verify the integrity of the JWT by checking if its signature is valid.
- Use a custom function to validate the JWT’s signature without throwing an error for expired tokens.
- Ensure JWT is Not Expired
- Check the expiration time of the JWT before using it for authentication.
- If the JWT is expired, trigger token rotation or reauthentication logic.
- Parsing JWT
- After verifying the JWT’s authenticity and ensuring it’s not expired, you can parse its payload and use the data for authentication and authorization purposes.
-
The process involves securely creating, signing, storing, and verifying JWTs for authentication in a SvelteKit app.
-
If you where to use the JWT’s for information exchange you can skip step 3 & 4 .
What is the Difference Between JWT and Session-based Authentication?
JWT provides stateless authentication, which is scalable and more suitable for modern applications, websites, mobile apps, etc.
Key Differences:
| Aspect | Session-based Authentication | JWT Authentication |
|---|---|---|
| State Management | Stateful (session data stored on server) | Stateless (token stored on client) |
| Storage | Session data stored on the server | JWT token stored on the client |
| Scalability | Difficult to scale (requires session synchronization) | Highly scalable (no server-side state) |
| Server Load | High (server must handle session management) | Low (token is self-contained) |
| Token Expiration | Session expires on the server or via a session timeout | JWT has built-in expiration, but server doesn’t store it |
| Use Cases | Traditional web apps, banking apps | Modern web apps, APIs, mobile apps, SPAs, microservices |
1. Session-based Authentication (Traditional Method)
-
Session Creation: When a user logs in, the server creates a session for the user. The session data (such as user ID, roles, etc.) is stored on the server-side.
-
Session ID: The server sends a session ID to the client in the form of a cookie. This session ID is used to reference the stored session data.
-
Stateful: The server keeps track of the state of each user’s session, which means every request requires the server to retrieve session data to verify the user’s identity and authorization.
-
Scalability Issues: Since the server has to store and manage session data for every user, this can become challenging when scaling applications, especially in distributed systems. Session data must be stored centrally or replicated across multiple servers.
-
Example: Websites like banking applications often use session-based authentication where the server manages and keeps track of the user’s session.
2. JWT Authentication (Token-based Method)
-
Token Generation: After the user logs in, the server generates a JWT containing encoded data (like user ID, roles, and expiration time). This token is then sent to the client.
-
Stateless: The token is stored on the client side (typically in local storage or a cookie). Since the server doesn’t store session data, this approach is stateless and does not require the server to keep track of the user’s authentication state.
-
Token Validation: On each subsequent request, the client sends the JWT in the request header (typically as an
Authorizationheader). The server validates the token’s signature and expiration time to authenticate the user, without needing to reference session data stored on the server. -
Scalable: Since no session state is stored on the server, JWT is inherently more scalable than session-based authentication. This makes it a better fit for modern distributed and microservice-based architectures where the server must handle large numbers of requests from various clients (e.g., mobile apps, SPAs, etc.).
-
Example: Modern websites, Single-page applications (SPAs), RESTful APIs, and mobile apps often use JWT authentication for stateless communication.
Advantages of JWT over Session-based Authentication:
- Statelessness: No server-side session management means no memory overhead for storing session data.
- Cross-domain support: JWT can be used across multiple domains (useful for single sign-on scenarios).
- Mobile and SPA Friendly: JWT is ideal for modern web applications, especially SPAs (Single Page Applications) and mobile apps that require stateless authentication.
Conclusion:
- JWT authentication is more appropriate for modern, distributed systems, where scalability, statelessness, and flexibility are critical. It is commonly used in RESTful APIs and client-server communications.
Security considerations and conserns
The security considerations when working with JWT tokens are not to complex, encryption, signature, no sensitive-data, Token life-span but if you fuckup. It will be noticed.
When working with JWT (JSON Web Tokens), there are several key security considerations to keep in mind:
-
Encryption vs Base64 Encoding:
- Base64 encoding is not encryption. It merely converts binary data into ASCII text for easy transport. Anyone who has access to the JWT can decode the payload and see the claims inside.
- Base64 encoding only obfuscates the data, not securing it. If confidentiality is important, encryption is necessary. A JWT is nativaly base64url encoded .
-
Data Integrity & Authenticity (HS256/HMAC):
- JWT tokens often use HS256 (HMAC) for signing the token. Signing occurs utilising you’re own private-set string aka key.
- Signing ensures that the data has not been tampered with and authenticates the source of the token. However, HS256 does not encrypt the payload, meaning the data is still visible ( if decoded ) to anyone who has the JWT. It has pure signing capabilities.
-
Confidentiality of Data (JWE):
- If you need to protect the confidentiality of the data (i.e., prevent unauthorized users from reading the payload), you must use JWE (JSON Web Encryption).
- JWE encrypts the payload to ensure that only authorized parties can read the data.
-
Do NOT store sensitive information
- It is highly not recommended to store sensitive information, such as passwords or other private user credentials, within a JWT. JWTs are designed for authentication and authorization, but they are not a secure storage mechanism.
-
Token Lifespan ( Use of Refresh Tokens )
- The lifespan of a JWT should be carefully considered when designing your authentication flow. JWTs typically include an expiration (
exp) claim that defines the token’s validity period. Short-lived tokens are generally preferred for security reasons, as they reduce the potential damage if a token is compromised. However, a short lifespan can also lead to a poor user experience, requiring users to frequently re-authenticate.
To address this, refresh tokens are commonly used. A refresh token is a long-lived token that is securely stored and can be used to obtain a new JWT when the original token expires. The refresh token allows users to stay authenticated without needing to re-enter credentials frequently
- Read more on
refreshTokenswithin my docs withingeneral-codecategory.
- The lifespan of a JWT should be carefully considered when designing your authentication flow. JWTs typically include an expiration (
Remember!, if you mess up with JWT security, it will be noticed. Always validate your implementation and test thoroughly.